A Guide to buying an Audio Interface for Computer Recording
Posted on Thu 09 March 2017 in entries
Every computer music setup needs a way of getting signals into and out of the computer, and to achieve this you really need to invest in an 'audio interface', often referred to as a “sound card”.
“But I have a headphone output and microphone input on my computer already. Why do I need a separate box to do the same thing?”
Read on to find out…
Audio Quality
The built-in audio on your computer is OK for watching Youtube, or using Skype, but the audio quality is usually woefully inadequate for music production or audio recording. Microphone inputs will be noisy, and not suitable for music recording, and the audio output is likely to be poor quality too.
One job of an audio interface is to take the digital signal generated by a computer, into an analogue signal that can be connected to other audio equipment – speakers, mixers, effects units, and headphones etc. This process is known as “Digital-To-Analogue conversion”, or D-to-A, or DA conversion. Achieving perfect conversion, so that the analogue signal is exactly the same as the original recording, is the ultimate goal. In reality, this is hard to achieve, and the audio output from a DA converter will most likely not be a perfect recreation of the original recording.
The other half of the issue is turning analogue signals (from microphones, keyboards, and guitars etc) into a digital signal that can be stored and manipulated by the computer. No prizes for guessing that this process is called “Analogue -To- Digital conversion” (A-to-D, or A/D conversion). The A/D converter needs to convert your lovely, smooth, analogue signal, into a stream of 1’s and 0’s that represent the analogue signal in a digital format that computers can understand. Again, to achieve this perfectly is difficult, and various factors can contribute to an imperfect A/D conversion.
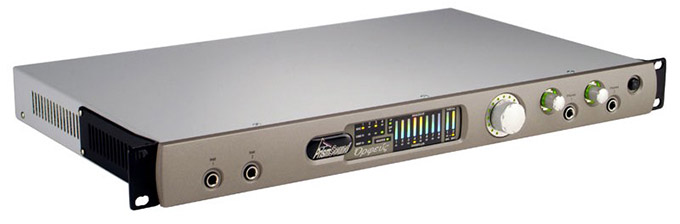
So, the difference between the built-in audio on your computer, and the very best A/D and D/A converters in a professional audio interface is huge, and the resulting audio quality difference is significant. A low cost audio interface (eg. Focusrite Scarlett 2i2 or Steinberg UR22) is still many times better than built-in audio, and is suitable for the majority of home recording projects, but to get the best audio quality possible requires much higher spec, and much more expensive, converters (eg RME UFX, or Prism Sound Orpheus). Generally, the more expensive the interface, the better the conversion will be.
Connectivity
The next thing to consider when buying an audio interface is connectivity, or “i/o” (input/output) – this determines what you can to plug into any particular interface, how many simultaneous inputs can be recorded, and the number of outputs that are available to plug into other devices.
A simple interface will most likely just have 2 audio inputs and 2 audio outputs. This is perfectly fine if you are only recording one or two signals at once, and only need to connect the output to a single pair of speakers. However, if you want to record a whole band “live” then you will need many more audio inputs to be able to record each instrument, or each microphone, onto separate tracks in your software.
Different audio interfaces have different i/o available, and these connections can be either analogue or digital.
Analogue inputs include line inputs, mic inputs, and instrument inputs. These three types of input cover all types of analogue signal you may which to record: line inputs for keyboards or electronic drum kits, microphone inputs for erm... microphones, and instrument inputs for plugging guitars and bass guitars straight in, without using an amplifier. Often, a special connector is used that can accept any type of signal (line, mic and instrument), known as a “combi input”, which can be confusing, but simply allows connections from either a “jack” or “xlr” connectors into the same socket.
Digital inputs can only be used to connect other digital equipment, and come in a variety of flavours including – ADAT (an optical connection that can carry 8 channels of audio at once), SPDIF (a stereo digital signal on either an optical or metal wire connection), AES/EBU (a professional version of SPDIF), TDIF (Tascam’s 8 channel wired connection), and MADI (an optical or wire connection that can carry up to 64 channels of audio).

The connections that you need will depend on what you envisage yourself doing and what other equipment you have. If you want to record a drum kit, for instance, you will need a bunch of analogue microphone inputs, and if you are recording an orchestra you will need even more analogue i/o for the array of mic’s that are required to capture the whole ensemble. But if you are only ever going to record one instrument at a time, then having only 2 analogue inputs would be fine.
So, when it comes to i/o, it’s “horses for courses” – choose an interface that has enough i/o for what you see yourself doing. Make sure the interface you buy has enough microphone inputs if that is important to you, or whether it has enough instrument inputs. One thing to note here is that digital inputs (especially ADAT), can be used to expand the number of analogue inputs you have available, simply by adding another separate A/D converter to your system (eg. Focusrite Octopre, or Audient ASP800), and taking the ADAT output from that converter and plugging it into an ADAT input on your interface.
USB, Firewire, Thunderbolt, PCIe or Ethernet
When choosing an interface, you have a choice as to how that interface will connect to your computer. Often, the choice you have is limited by what connections are available on your computer – eg. many PC laptops will only have USB, new Macs will have Thunderbolt, older Macs will have Firewire.
The data transferred through the various connection types is fundamentally the same. There are differences in the way the data is transferred, but that topic is too deep, and arguably not relevant, to this article. What may be more important is the speed of data transfer, and each connection type is capable of different speeds, and therefore affects the number of channels that can be passed down the cable simultaneously. This is the “bandwidth” of the connection, and starts to become important in multi-channel systems.
USB1 is rarely used these days, and can only handle a relatively small number of channels, I would suggest staying clear of any USB1 audio interfaces.
USB2 and Firewire have similar bandwidths, and can handle multi-channel systems easily
USB3 has generally not yet been implemented by audio interface manufacturers, but is capable of very high channel counts.
Thunderbolt (and now Thunderbolt 2) is Apple’s hi-speed connection, and has a very large bandwidth capable of hundreds of channels of audio.
PCIe is a connection type for internal audio interfaces (not external interfaces connected by a cable), and also has a very large bandwidth.
Ethernet is also becoming a more popular as a way of getting audio from one device to another, but is found mostly on high-end units that use audio networking to create complex audio systems.
Latency
One issue you will encounter when using an audio interface is “latency”. This is the time delay introduced by the computer when transferring data and AD or DA converting.
There will always be some latency in any system, but well written drivers installed on a fast computer will minimize the issue. The brain can perceive delays of 10ms or more, anything below that is not noticeable, but latencies higher than this will start to cause issues if you are trying to monitor in real time – eg. if you are recording a vocal, and the singer is listening to their voice through headphones fed from the audio interface, then they will hear themselves a fraction late through the headphones. This is very disconcerting for the performer, and needs to be reduced to an acceptable amount for them to be able to perform successfully. Similarly, if you are using “virtual instruments” (computer generated sounds), then there may be a delay between pressing a key on your MIDI keyboard, and the sound coming out. Again, this makes playing in time quite difficult, and needs to be minimized in some way.
So how do we reduce latency?
Luckily, modern audio interfaces and computers have reduced the latency issue, but it is still there and needs to be managed properly. Most audio interfaces have a setting (usually found in a control panel that gets installed along with the driver) called “buffer size”. If the buffer size is lowered, the latency will be reduced, but the CPU will “overload” sooner, and fewer tracks can be played back before the audio gets glitchy. Raising the buffer size increases the latency, but allows more processing power for more tracks or virtual instruments. A good way to work is to start with the buffer size as low as possible, and then raise it as your song becomes more complicated.
There are two other ways audio interface designers have overcome latency: “direct monitoring” and “DSP mixing”.
Direct Monitoring is a way of feeding the audio input (eg. microphone input) directly to the audio outputs of the interface, without the signal going down the cable, into the computer, then back out again. The signal still gets recorded to the computer, but the input signal is monitored directly in the interface, and mixed with the playback of other tracks from the computer. This way, the performer hears themself with zero latency, and the problem is solved.
The second strategy to eliminate recording latency is “DSP mixing”. This takes the same idea of direct monitoring, and applies it to audio interfaces that have multiple i/o. Audio interfaces with DSP have an entire digital mixer built into them, accessed through a control panel on the computer. This kind of system allows for any input signal to be fed to any output at any volume level, at zero latency. Manufacturers that include this kind of functionality include RME (with their TotalMix system), MOTU (using CueMix), and Universal Audio.

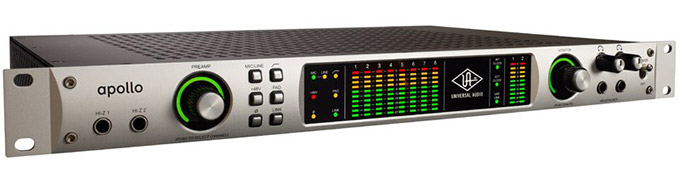
Audio interfaces with a DSP mixer also often have DSP effects that can be added to the signals going through the mixer. In some cases these effects are only for ”monitoring”, and won’t be recorded to the computer (but are good for the performer to perform with a bit of reverb etc.), while others do allow these effects to be recorded to the computer. The Universal Audio Apollo units are an example of this, where the DSP effects can actually be applied to any previously recorded track.
Included software
With such a competitive market place, audio interface manufacturers often try to win your business by including free software. This is true of most entry- to mid-level interfaces, and in some cases the software included is perfectly adequate for basic home recording, and often opens the way to “upgrade” to full versions of the included software.
Software bundled with interfaces include Ableton Live (“Lite version”), Cubase (LE or AI cut-down versions), Presonus Studio One (Artist version), and others. This may have a bearing on your buying decision, and so it’s worth knowing what software each interface comes with. Our audio interface pages show tell you what DAW (Digital Audio Workstation, read “recording”) software is included with each interface – on the left hand side of the product listing pages under the heading “DAW”.
Sample Rate and Bit Depth
There are two terms that you should be aware of that describe the resolution of audio in a digital system, they are sample rate and bit depth.
Sample rate is the ‘number of samples per second’ and determines the maximum audio frequency that can be digitised. A clever chap called Nyquist worked out that the highest frequency that can be encoded by a digital system is the sample rate divided by two. So CD, for example, is 44.1kHz (44,100 samples per second), and can reproduce audio up to 22.05 kHz (just above the human hearing limit). Common sample rates used in audio are 44.1kHz, 48kHz, 96kHz and 192kHz. So if a system is capable of 192kHz, it encodes the audio information up to half of that frequency – 96kHz, which is far higher than we can actually hear!
Bit depth is the ‘number of bits used per sample’ and determines the audio resolution of a digital system. One way to think about this is how “steppy” the digital waveform will be at a certain bit rate. If you only had a 4-bit system, then a nice smooth sine wave would no longer be smooth as each sample could only be described by one of 16 values (2 to the power of 4). The resulting waveform would look like a series of steps roughly following the shape of the sine wave. The resulting sound would sound a bit like a sine wave, but would also have additional frequencies ( known as quantisation distortion) due to the ‘steppiness’ of the waveform, and would sound very lo-fi.
 ]({static}/uploads/2015/04/inptsine.gif)
As you increase the number of bits used per sample, those ‘steps’ get closer and closer to the nice smooth waveform you started off with. So a 16-bit system (the bit depth used for CD format) has 65,536 possible values (2 to the power of 16), and the waveform reproduced will be very close to the original waveform. A 24-bit system, on the other hand, describes the waveform using 16,777,216 possible values, and retains good resolution even at quieter levels.
So what does this mean for audio interfaces?
Well, you might surmise from the above that having very high sample rates and bit depths will give you better quality recordings, and you would be right – but there are other factors to be taken into account!
Some interfaces are capable of 32-bit, 192kHz, so you should get one of them, right?
Well, the resolution of the digital converters is one aspect, but there are also analogue electronic circuits surrounding the converters, and in some cases having such high resolution is pointless as the noise and distortion from the analogue circuitry outweighs this.
Moreover, if you did set your project at those settings you would be using up considerably more computer resources. The ‘data rate’ (how much data per second needs to be processed) of 32-bit/192kHz is significantly higher than at say 24-bit/48kHz, so you will be able to play back much fewer audio tracks, add fewer effects plug-ins, and run a lot less virtual instruments if you work at high data rates.
The moral of the story, then, is “don’t be fooled by what you read on the digital specifications”, as there is more to the ‘quality’ of the audio than just sample rate and bit depth. Most converters these days are very good, and in many cases different audio interface manufacturers use the same AD/DA converter chips, a more important figure to look at is the ‘signal-to-noise ratio’ as this takes into account the converter and the surrounding electronics.
Our Favourites
With so many interfaces around, it can be hard to work out which one is most suitable for you, so we have put together a list of some of the most popular interfaces that may help you to make a decision, starting with entry level interfaces and moving up the scale…
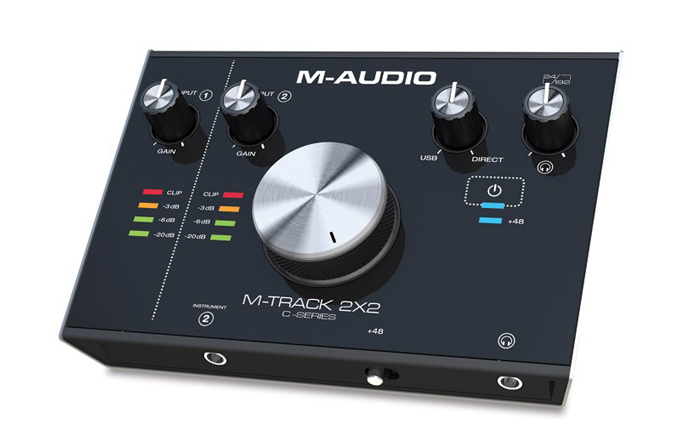
USB, 2 inputs (combi), 2 outputs, MIDI i/o, and comes bundled with Cubase AI software. Great sounding entry level interface, and the included software is very good.
https://www.absolutemusic.co.uk/m-audio-m-track-2x2-usb-audio-interface.html
The M-Audio M-Track 2x2 is a low cost interface that provides 2 inputs (1x mic/line & 1x instrument/line), a pair of outputs for monitor connection, and headphone output. The build quality is excellent, and the suite of software is impressive, including Cubase LE, Xpand!2 - a multitimbral workstation, drums, pianos and effects.
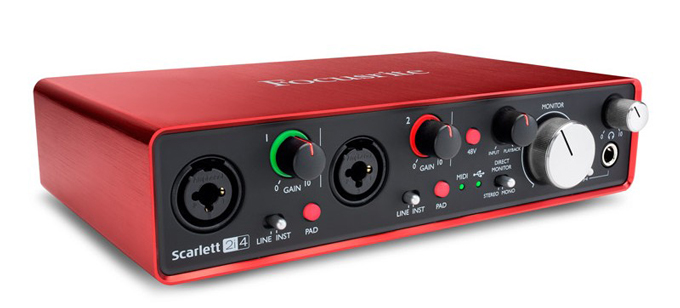
USB, 2 inputs (combi), and 4 outputs (extra outputs are good for DJs who need to “cue up” another song on headphones before sending it out to the main outputs), MIDI i/o, and Includes Pro Tools | First - Focusrite Creative Pack and Ableton Live Lite.

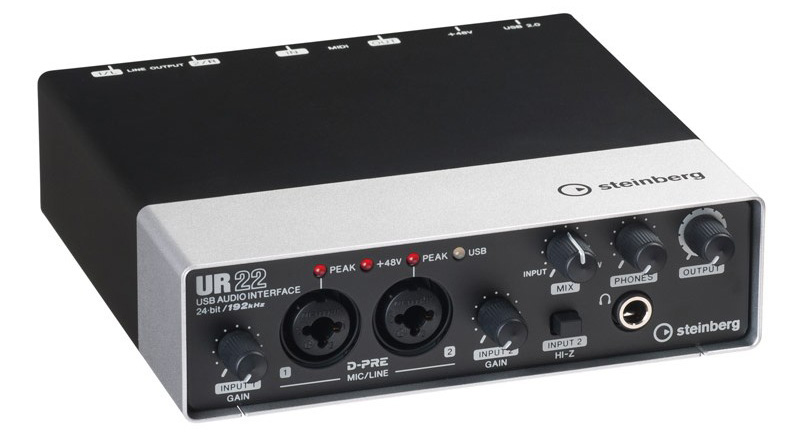
USB, 2 inputs (combi) with very high quality mic preamps, 4 outputs, ADAT input, DSP mixer, and monitor controller functionality. Very good spec for the money!

USB, 8 mic inputs, 10 analogue outputs, ADAT in and out, SPDIF in and out, and MIDI. Bundled with Ableton Live Lite software and the Focusrite Red Plug-In Suite. Lots of i/o for not too much cash!
Universal Audio Apollo Twin (Solo or Duo DSP versions)
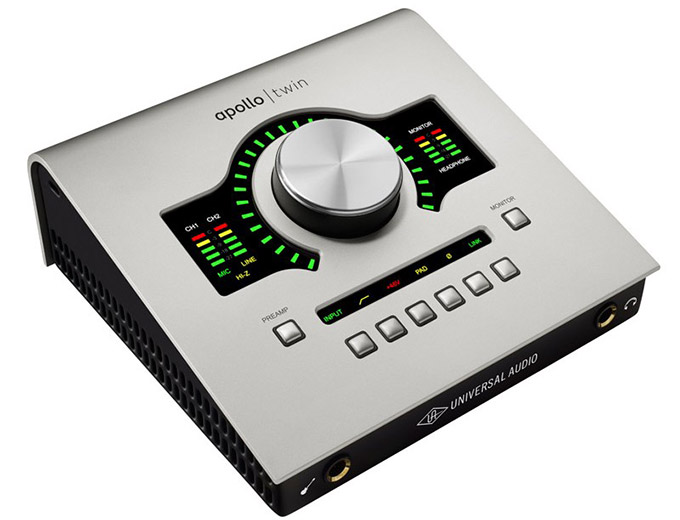
Thunderbolt, 2 inputs (combi), 6 outputs, ADAT input, DSP effects that can be used as DAW effects. Very good DSP effects platform, and solid desktop interface.
Hybrid (USB and Firewire), 8 analogue inputs (2 mic channels, 2 instrument channels), 8 analogue outputs, ADAT in and out, SPDIF in and out, MIDI, and DSP mixer with effects. A quality interface with excellent AD/DA conversion.
A range of interfaces with various i/o, all with DSP mixer and effects that can be used within your DAW. Excellent quality effects, and very good AD/DA conversion.

Thunderbolt 2, 10 analogue inputs (8 mic’s), 16 analogue outputs (D-Sub connector), and 2x ADAT i/o. Lots of connectivity for larger studios, and very good AD/DA conversion.
Firewire, 8 analogue in (4 mics, 2 instrument, & turntable input), 8 analogue out, ADAT in and out, SPDIF in and out, and DSP mixer. Very high quality interface with top-of-the-range AD/DA conversion.